# SourceMap解析CLI工具实现
本文为稀土掘金技术社区首发签约文章,14天内禁止转载,14天后未获授权禁止转载,侵权必究!
# 前言
source-map 大家都不陌生了,通常情况就是产物里的xx.js.map文件里的内容。
可用于对压缩混淆后的代码还原。通常用于帮助定位源码问题。
区别于构建时的配置(以webpack 的devtool配置项为例 (opens new window))不同配置,source-map暴露的信息程度也就也不一样
一般公司里的项目,是会把.map文件上传到内网环境,不耽误问题排查,也不暴露源码
个人的开源项目,一般就没这么讲究了,直接和产物一起传了。
前端监控平台,一般都支持错误堆栈解析,通过.map,还原出错代码位置调用堆栈信息。
有时候没有自动解析的平台可用的时候(比如一些商用监控平台,免费版通常不提供自动source-map解析能力)
就会搜些在线source-map解析工具凑合一下,包含在线网页,以及CLI版本的。作者也体验使用了一些(都贴到最后附录列表中,读者有其它推荐的也可评论区补充)。
本文将综合现有的source-map cli解析工具优缺点,取长补短,🐴一个缝合怪(主要包含报错源码解析和根据sourceMap文件生成源码2个能力)。
先上个演示,有兴趣的读者可接着往下看
npm i -g @sugarat/source-map-cli
# source-map库的简介
npm地址:source-map (opens new window)
可以用于生成和解析sourcemap的库,本文主要用到其解析的能力,关注API:SourceMapConsumer (opens new window)即可
下面是示例,其返回值consumer是一个Promise
import sourceMap from 'source-map'

function createSourceMapConsumer(sourceMapCode: string) {
  const consumer = new sourceMap.SourceMapConsumer(sourceMapCode)
  return consumer
}
2
3
4
5
6
consumer中包含一个sources属性,标明了包含的所用到的源码文件路径信息,通过实例上的sourceContentFor方法即可获取到对应文件(source)的源码(sourceCode)
// mapContent 内容来源 https://script.sugarat.top/js/tests/index.9bb0da5c.js.map
;(async () => {
  const consumer = await createSourceMapConsumer(mapContent)

  // [
  // '../../vite/modulepreload-polyfill',
  // '../../node_modules/.pnpm/@vue+shared@3.2.37/node_modules/@vue/shared/dist/shared.esm-bundler.js',
  // 类似的源文件路径
  // ]
  const sourceFileNames = consumer.sources

  // 源文件个数
  const sourceCount = sourceFileNames.length

  // 第一个源文件的内容
  const sourceCode = consumer.sourceContentFor(sourceFileNames[0])
})()
2
3
4
5
6
7
8
9
10
11
12
13
14
15
16
17
consumer实例上的另一个最常用的方法originalPositionFor可以通过压缩混淆后的代码行列号,解析出源文件信息。
包含源文件source,行号line,列号column,name
// 第一个源文件的内容
const sourceCode = consumer.sourceContentFor(sourceFileNames[0])

// 通过压缩混淆后的代码的行列号,定位到源文件
const sourceInfo = consumer.originalPositionFor({
  line: 24,
  column: 17596
})

// 这个例子的结果如下
console.log(sourceInfo)
//   {
//     source: '../../node_modules/.pnpm/vue-router@4.0.14_vue@3.2.37/node_modules/vue-router/dist/vue-router.esm-bundler.js',
//     line: 2882,
//     column: 12,
//     name: null
//   }
2
3
4
5
6
7
8
9
10
11
12
13
14
15
16
17
通过如上2个简单的API即可完成常用能力的封装。
# .map资源加载
通常每个js产物都对应有一份.map文件,文件命名为原文件名.js.map
在不考虑特殊的约定条件情况下,通常情况是在js产物末尾都有1个// #sourceMappingURL=xx.js.map注释表明js资源关联的map文件路径
于是乎咱们,可以先写个方法来获取传入文件对应的sourceMap文件路径
# 本地sourceMap路径获取
先是考虑本地的情况,通过路径拼接.map与读取文件文件末尾sourceMappingURL2种方式相结合
function getLocalSourceMapFilePath(sourceJsPath: string) {
  // 文件不存在
  if (!existsSync(sourceJsPath)) {
    return NOT_FOUND
  }

  // 先直接判断是否存在.js.map文件存在
  if (existsSync(`${sourceJsPath}.map`)) {
    return `${sourceJsPath}.map`
  }

  // 获取代码里的 // #sourceMappingURL= 注释的内容
  const jsCode = readFileSync(sourceJsPath, 'utf-8')
  const flag = '//# sourceMappingURL='
  const flagIdx = jsCode.lastIndexOf(flag)
  if (flagIdx === -1) {
    return NOT_FOUND
  }
  const sourceMappingURL = jsCode.slice(flagIdx + flag.length)

  // 如果是http路径表明 是绝对路径 直接返回
  if (isHTTPSource(sourceMappingURL)) {
    return sourceMappingURL
  }

  // 否则拼接js资源的目录
  return path.resolve(path.dirname(sourceJsPath), sourceMappingURL)
}
2
3
4
5
6
7
8
9
10
11
12
13
14
15
16
17
18
19
20
21
22
23
24
25
26
27
28
# 远程资源加载
除了本地情况那也有线上资源的情况,比如用于测试的https://script.sugarat.top/js/tests/index.9bb0da5c.js
下面介绍3种常见方式获取http资源,http,axios,fetch
首先是http,node内置网络模块,使用上的感官和web里的XMLHttpRequest (opens new window)差不多,不太优雅
简单场景书写代码量也在可接受的范围
import http from 'http'
import https from 'https'

function getRemoteSource(
  url: string
): Promise<{ body: string; code?: number }> {
  return new Promise((resolve, reject) => {
    // 区别https与http资源
    const HTTP = url.startsWith('https://') ? https : http

    // 通过回调的形式获取
    HTTP.get(url, (res) => {
      // 设置可读流的字符编码
      res.setEncoding('utf-8')

      // 响应内容拼接
      let content = ''
      res.on('data', (chunk) => {
        content += chunk
      })

      // 读完对外暴露内容和状态码
      res.on('end', () => {
        resolve({
          body: content,
          code: res.statusCode
        })
      })

      res.on('error', (err) => {
        reject(err)
      })
    })
  })
}
2
3
4
5
6
7
8
9
10
11
12
13
14
15
16
17
18
19
20
21
22
23
24
25
26
27
28
29
30
31
32
33
34
35
axios,前端常用的跨平台网络请求库(web/node/其它场景提供adaptor层做适配)
用这个代码量就更简洁了,3行就能搞定
function getRemoteSourceByAxios(url: string) {
  return axios.get(url).then((v) => {
    return {
      code: v.status,
      body: v.data
    }
  })
}
2
3
4
5
6
7
8
fetch,在web侧已经出现很久了,Node.js>=v17.5.0 内置,低版本可使用第三方的node-fetch (opens new window)
这里使用node-fetch进行举例,使用也是非常简单
import fetch from 'node-fetch'

function getRemoteSourceByFetch(url: string) {
  return fetch(url).then(async (v) => {
    const code = v.status
    const body = await v.text()
    return {
      code,
      body
    }
  })
}
2
3
4
5
6
7
8
9
10
11
12
包含但不限于以上三种方式达到需要的目的。本小节示例代码 (opens new window)
# 远程sourceMap路径获取
思路和本地的资源逻辑基本一致,只是内容获取和判断需要走网络,实现如下,接近一半都是重复代码,有优化空间,这里不赘述了
async function getRemoteSourceMapFilePath(sourceJsPath: string) {
  const context = await getRemoteSource(sourceJsPath)
  if (context.code === 404) {
    return NOT_FOUND
  }
  if ((await getRemoteSource(`${sourceJsPath}.map`)).code === 200) {
    return `${sourceJsPath}.map`
  }
  const jsCode = context.body
  const flag = '//# sourceMappingURL='
  const flagIdx = jsCode.lastIndexOf(flag)
  if (flagIdx === -1) {
    return NOT_FOUND
  }
  const sourceMappingURL = jsCode.slice(flagIdx + flag.length)
  if (isHTTPSource(sourceMappingURL)) {
    return sourceMappingURL
  }
  return path.resolve(path.dirname(sourceJsPath), sourceMappingURL)
}
2
3
4
5
6
7
8
9
10
11
12
13
14
15
16
17
18
19
20
简单做合并后的方法如下
const isHTTPSource = (sourcePath: string) =>
  sourcePath.startsWith('http')

async function getSourceMapFilePath(sourceJsPath: string) {
  if (!isHTTPSource(sourceJsPath)) {
    return getLocalSourceMapFilePath(sourceJsPath)
  }
  return getRemoteSourceMapFilePath(sourceJsPath)
}
2
3
4
5
6
7
8
9
# 还原报错源码
有了前面的基础,咱们第一个整合功能就可以实现了 根据报错资源信息,还原源码和行列号,先给出方法的定义
interface SourceResult {
  /**
   * 源码
   */
  sourceCode: string
  /**
   * 源码文件路径
   */
  source: string
  /**
   * 行号
   */
  line: number
  /**
   * 列号
   */
  column: number
}

/**
 * 根据报错资源信息,获取对应源码信息
 * @param url 报错资源
 * @param line 行号
 * @param column 列号
 */
async function getErrorSourceResult(
  url: string,
  line: number,
  column: number
): Promise<SourceResult>
2
3
4
5
6
7
8
9
10
11
12
13
14
15
16
17
18
19
20
21
22
23
24
25
26
27
28
29
30
利用上面实现的getSourceMapFilePath,配合source-map的2个API即可实现originalPositionFor,sourceContentFor
import fs from 'fs/promises'

const sourceMapURL = await getSourceMapFilePath(url)

// sourceMap 内容
const sourceMapCode = await (isHTTPSource(sourceMapURL)
  ? getRemoteSource(sourceMapURL).then((v) => v.body)
  : fs.readFile(sourceMapURL, 'utf-8'))

const consumer = await createSourceMapConsumer(sourceMapCode)
// 解析出原来的行列号,源文件路径等信息
const { name, ...rest } = consumer.originalPositionFor({
  line,
  column
})
// 获取源码
const sourceCode = consumer.sourceContentFor(rest.source!)
const result = {
  ...rest,
  sourceCode
}
2
3
4
5
6
7
8
9
10
11
12
13
14
15
16
17
18
19
20
21
方便终端里预览结果,可以编写一个printSourceResult方法,友好的打印输出一些内容
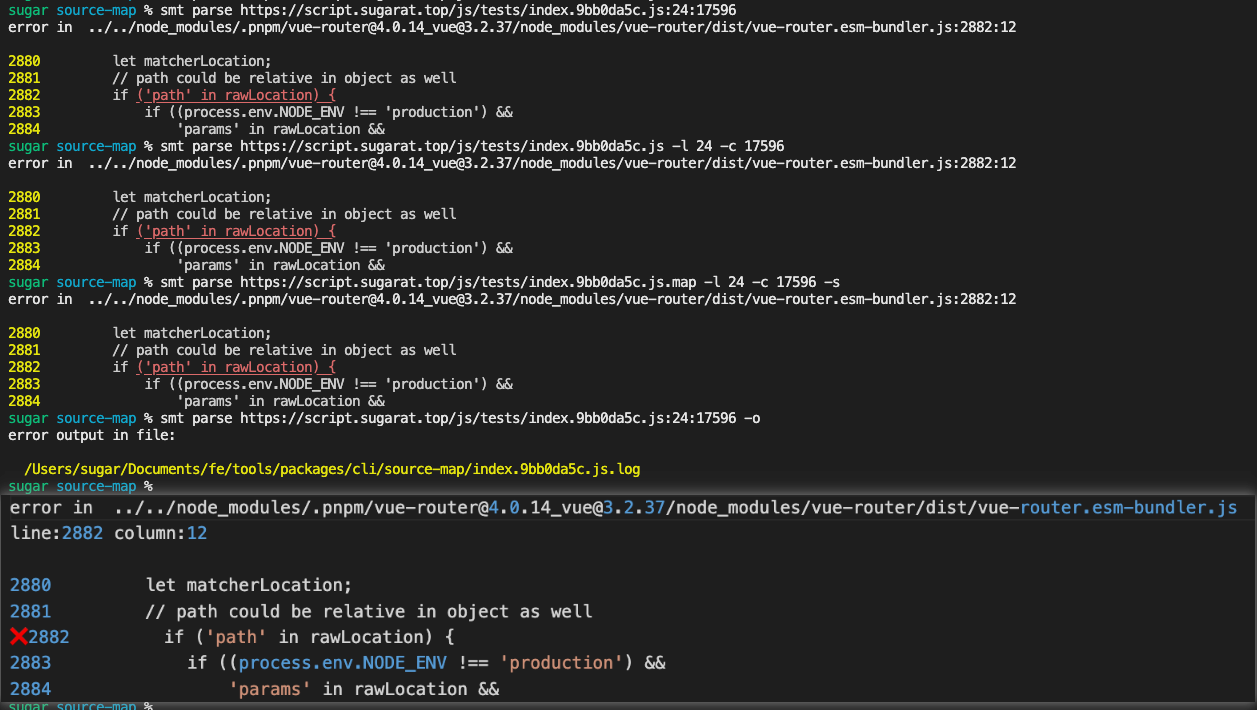
getErrorSourceResult(
  'https://script.sugarat.top/js/tests/index.9bb0da5c.js',
  24,
  17596
).then(printResult)
2
3
4
5
示例打印结果如下

方法实现如下(详细释义见注释)
/**
 * @param result
 * @param showMaxLine 控制显示的行数
 */
export function printResult(result: SourceResult, showMaxLine = 5) {
  const { sourceCode, source, line, column } = result
  // 源码拆成数租
  const lines = sourceCode.split('\n')

  // 打印错误路径
  console.log(`error in  ${source}:${line}:${column}`)
  console.log()

  // 计算要展示的行的起始位置,起始行号不能小于1
  const startLine = Math.max(1, line - Math.floor(showMaxLine / 2))
  // 结束位置不能大于总行数
  const endLine = Math.min(lines.length, startLine + showMaxLine - 1)

  const showCode = lines
    // 截取需要展示的内容
    .slice(startLine - 1, endLine)
    .map(
      (v, idx) =>
        // 加上黄色行号
        `${yellowStr(startLine + idx)} ${
          // 针对错误的行进行下划线+红色展示
          idx + startLine === line
            ? // 从错误的列号开始展示
              v.slice(0, column - 1) + redStr(underlineStr(v.slice(column - 1)))
            : v
        }`
    )
    .join('\n')

  console.log(showCode)
}
2
3
4
5
6
7
8
9
10
11
12
13
14
15
16
17
18
19
20
21
22
23
24
25
26
27
28
29
30
31
32
33
34
35
36
打印彩色的场景有限,这里直接将需要的效果颜色对应的ANSI Escape code从chalk库中截取出来
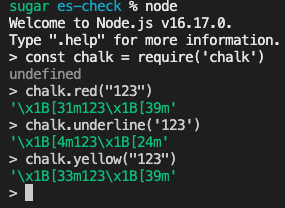
const underlineStr = (v: any) => `\x1B[4m${v}\x1B[24m`

const yellowStr = (v: any) => `\x1B[33m${v}\x1B[39m`

const redStr = (v: any) => `\x1B[31m${v}\x1B[39m`
2
3
4
5
到此第一个功能的核心代码就封装好了
# 完整source生成
都知道通过sourceMap可以获取完整的源码,所以一般的非开源应用,都是对sourceMap文件做了环境隔离,防止源码泄露。
这部分就封装1个方法,实现将sourceMap中包含的所有源文件输出到本地指定目录
首先实现1个方法,将sourceMap中需要的信息解析出来
export async function getSourcesBySourceMapCode(sourceMapCode: string) {
  const consumer = await createSourceMapConsumer(sourceMapCode)
  const { sources } = consumer
  const result = sources.map((source) => {
    return {
      source,
      code: consumer.sourceContentFor(source)
    }
  })
  return result
}
2
3
4
5
6
7
8
9
10
11
配合文件操作(fs模块),将内容输出到文件系统
import { existsSync, mkdirSync, writeFileSync } from 'fs'

async function outPutSources(
  sources: SourceItem[],
  outPutDir = 'source-map-result/project'
) {
  for (const sourceItem of sources) {
    const { source, code } = sourceItem
    const filepath = path.resolve(process.cwd(), outPutDir, source)
    if (!existsSync(path.dirname(filepath))) {
      mkdirSync(path.dirname(filepath), { recursive: true })
    }
    writeFileSync(filepath, code, 'utf-8')
  }
}
2
3
4
5
6
7
8
9
10
11
12
13
14
15
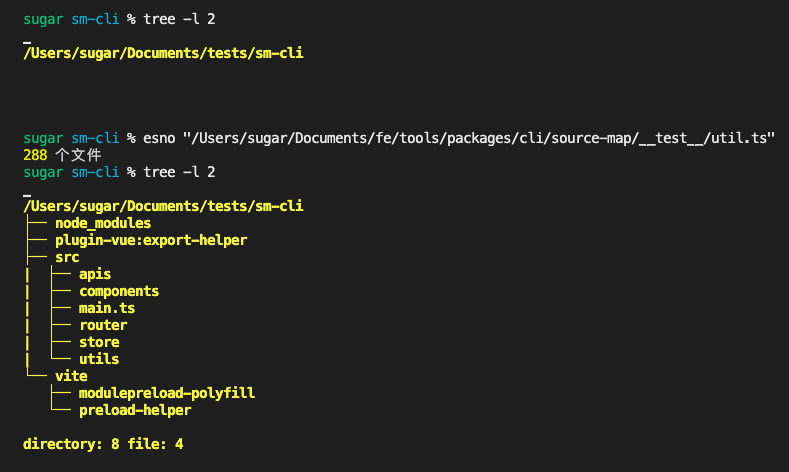
示例代码与运行结果如下
getRemoteSource(
  'https://script.sugarat.top/js/tests/index.9bb0da5c.js.map'
).then(async ({ body }) => {
  const sources = await getSourcesBySourceMapCode(body)
  console.log(sources.length, '个文件')
  outPutSources(sources)
})
2
3
4
5
6
7
到此常用的2个能力的核心实现就完成了,下面将把其封装为一个CLI工具,方便接入使用
# 封装CLI
基于commander进行实践
# parse指令
首先是指令的定义
主要功能就是将指定的 error js 资源的通过sourcemap还原出具体的报错源码
program
  // sourceUrl 格式 <url>[:line][:column]
  .command('parse <sourceUrl>')
  .description('parse error form url source')
  .alias('p')
  // 标明sourceUrl 是否为 sourceMap 资源
  .option('-s, --source-map', 'set url source as sourceMap type')
  // 单独设置行号
  .option('-l, --line <number>', 'set line number')
  // 单独设置列号
  .option('-c, --column <number>', 'set column number')
  // 将结果输出到文件
  .option('-o, --output [string]', 'set log output dir')
  // 设置展示的错误信息行数
  .option('-n, --show-num <number>', 'set show error source lines', '5')
  .action(parseCommand)
2
3
4
5
6
7
8
9
10
11
12
13
14
15
16
为保证下面3个指令一样的效果,需要对 <sourceUrl> 与 -c,-l Option做一层处理
smt parse xxx.js:24:17596
smt parse xxx.js -l 24 -c 17596
smt parse xxx.js:24 -c 17596
2
3
const match = sourceUrl.match(/:\d+/)
let url = sourceUrl
let l
let c
if (match?.index) {
  ;[l, c] = sourceUrl.slice(match.index + 1).split(':')
  url = sourceUrl.slice(0, match.index)
}
// 最终需要的行号和列号
const line = l || options.line
const column = c || options.column
2
3
4
5
6
7
8
9
10
11
后续的处理逻辑只需要把url,line,column3个参数传给前面实现的getErrorSourceResult方法即可
效果如下
# sources指令
sources指令定义
program
  .command('sources <sourceUrl>')
  .description('generating source files by source-map')
  .alias('s')
  .option('-s, --source-map', 'set url source as sourceMap type')
  .option('-o, --output [string]', 'set log output dir')
  .action(sourcesCommand)
2
3
4
5
6
7
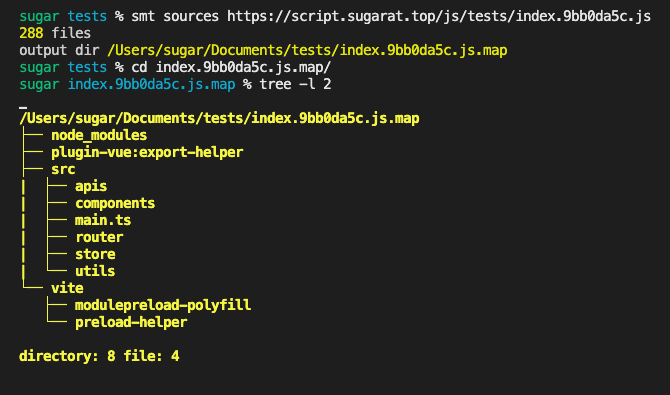
效果如下
# 最后
这个CLI本身能力比较简单,依赖的核心库也只有source-map。主要用于弥补缺失平台自动解析source-map能力的场景,协助定位js error的报错源码
后续再出一篇在线sourcemap解析的工具,功能与CLI类似,不过是Web版的
CLI完整源码见GitHub (opens new window)
# 附录
其它同类 Web&CLI 工具
Web
CLI